On-prem
On premises deployment does not take advantage of Kubernetes. It can be hosted in a VM on a single machine
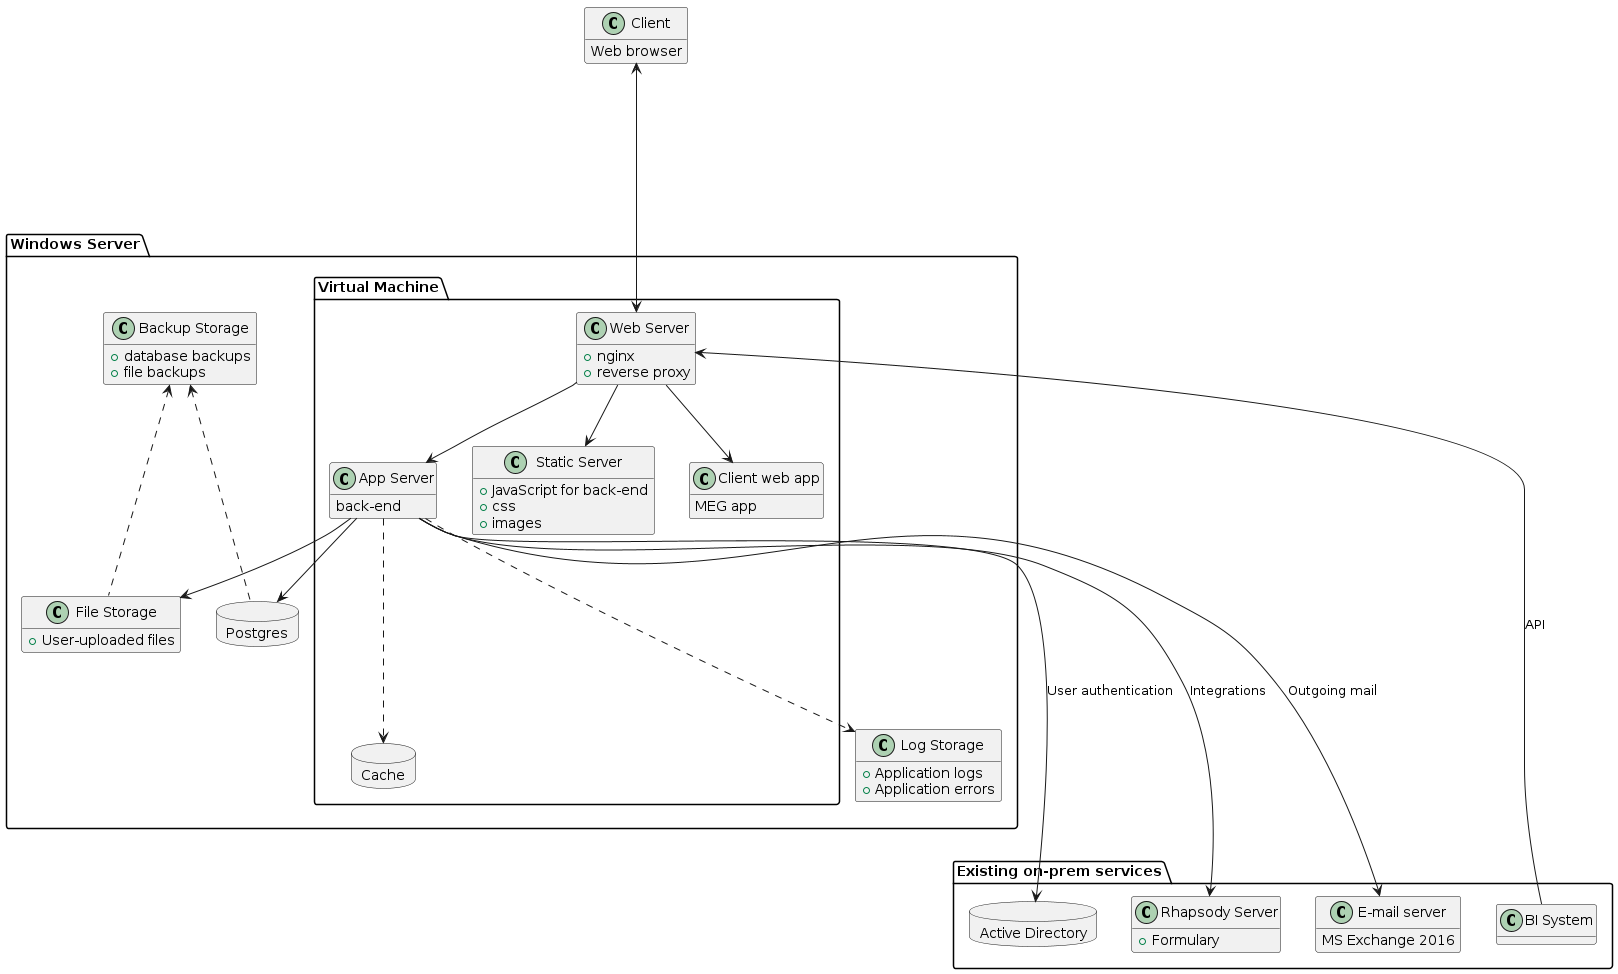
On-prem architecture diagram
- VM
Virtual Machine; a software emulating a computer inside another computer (host). It can run a different operating system than host.
- provisioning
the process of installing software and configuring a VM. In Vagrant, provisioning is the first step after the VM is created using vagrant up, but can be ran again if provisioning steps have changed to apply them using vagrant up --provision, or vagrant provision.
- vagrant box
- box
a provisioned and packaged vm that can be transferred to another computer and ran.
- On-prem
- Onprem
On-premises; as opposed to “in cloud” describes a setup where MEG QMS is installed on client’s own network.
- CA
Certificate Authority
- CSR
Certificate signing request; a template file used to create a certificate by CA based off a trusted root certificate.
Vagrant box
The vagrant box contains the backend and client app with all components required to run it. It requires database on host machine to connect to.
These configuration files are located in /onprem/box and are used to build the Box that can be deployed to client premises.
Important
Vagrant box definition is located in /onprem/box. All commands in this section need to be ran in that directory.
VagrantfileVagrant file containing VM definition and provisioning instructions. It is used to build a VM box that contains the MEG application and all the necessary files to run it.
docker-compose.ymlthe compose file describing and configuring all components of meg.
envBase environment variables for the QMS and the client app. It provides default values that can be overridden by deployed instance.
megit.confNginx server configuration to proxy incoming connections to the relevant docker containers. This file is symlinked to nginx, so any changes to it will affect nginx server. Any changes to this file should be followed by sudo nginx -s reload to reload nginx.
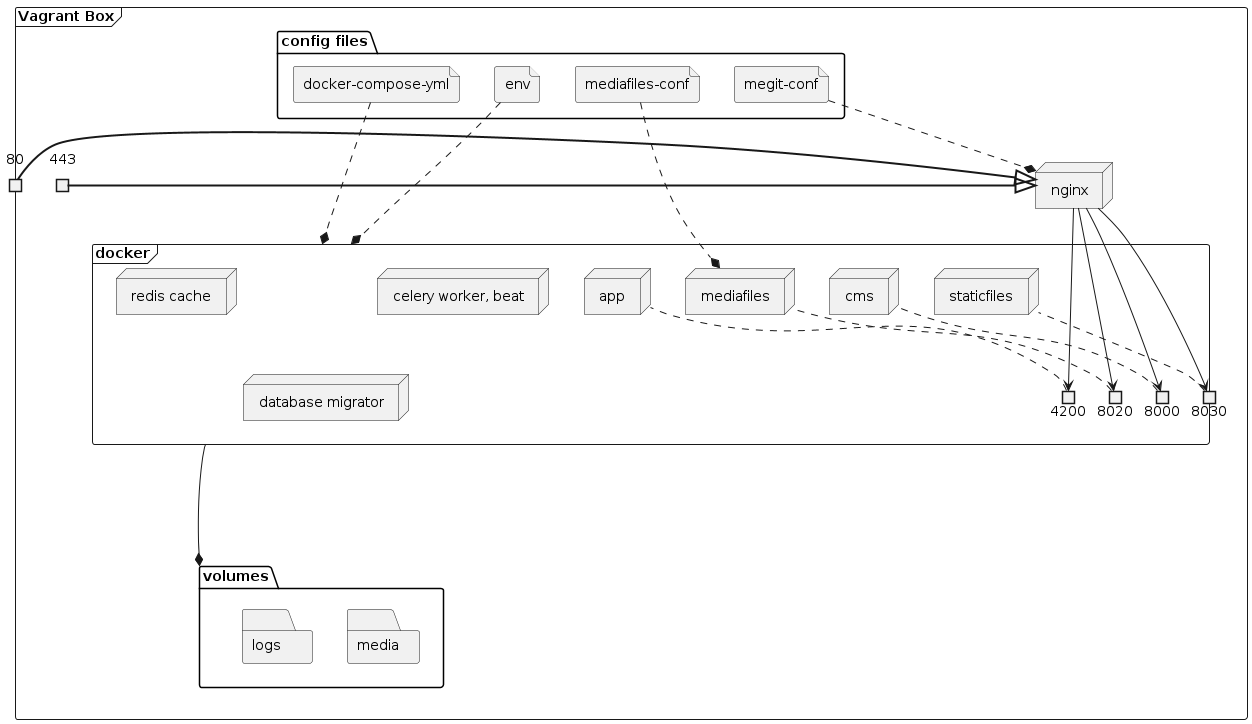
Vagrant box contents
Required environment variables
The following variables are required to build the Vagrant VM. Version number will be stored in the VM,
but ACR_KEY is only required for provisioning.
- ACR_KEY
Valid Access key to Azure Container Registry. Required to pull docker images for the QMS and its components.
- APP_VERSION
MEG client app version to be packaged in the box.
- VM_NAME
Name of the vagrant VM. Override the name if you need to make it unique, for instance when making concurrent builds.
- Default:
megit-base
Run the VM
Vagrant VM can be built and ran locally for testing. Before running, you need to ensure that postgres is running and accepting connections.
Edit env with the correct POSTGRES_HOST value pointing at your host machine.
onprem/box directoryvagrant up
vagrant ssh -c "docker-compose up -d"
When the VM is running, the site is being served on port 80 (and 443 for HTTPS) on your localhost, so you can access the back-end easily via localhost. The app is only served at app.localhost. The mirth connect web view is served at web.mirth.localhost. The mirth connect admin endpoint is served at admin.mirth.localhost. There’s no web view for this endpoint.
Note
You can edit your hosts file to replicate domains on
client’s network. For example, append the following lines to Windows/System32/Drivers/etc/hosts:
127.0.0.1 eqms.kfmmcmed.net
127.0.0.1 cqieqms.kfmmcmed.net
127.0.0.1 web.mirth.kfmmcmed.net
127.0.0.1 admin.mirth.kfmmcmed.net
When finished, you can delete the VM using vagrant destroy, or just shut it down using vagrant halt. To reload any changes made locally to config files, run vagrant reload.
Build and package the Box
To build a Vagrant box, you need to provision and package it. It is a good idea to delete any existing VM using vagrant destroy to ensure that the box is built on a clean box.
Important
The VERSION variable must be a valid release version of the project already deployed to Azure Container Registry.
Only invoke this command on the commit that has been tagged. If you’re only testing the box, you can hardcode any version you want.
Any changes to this value require that vagrant VM be re-provisioned.
Important
Ensure that the web app for this APP_VERSION is built by triggering docker:build:web
job in the client app’s tag pipeline.
This builds the ${VERSION}-web image necessary to deploy the app as a docker container.
onprem/box directory# Version number of MEG back-end
export VERSION=$(git describe --tags --abbrev=8)
# Version number of MEG client app - use the latest stable release
export APP_VERSION="3.45"
# Password for Azure Docker Registry (you can extract it manually if you're logged in to Azure CLI)
export ACR_KEY=$(az acr credential show --name MegForms --query "passwords[1].value" --output tsv)
vagrant box update
vagrant up
vagrant halt
vagrant package --output=meg-qms-v${VERSION}.box
Note
While running vagrant up you may run into the following error:
A VirtualBox machine with the name 'megit-base' already exists.
Please use another name or delete the machine with the existing
name, and try again.
To fix this, open virtualbox and remove the vm with that name, deleting all files.
The packaged .box should be stored on a secure drive and transferred to the server.
Generate a signed SSL certificate
Use key stored in onprem/box/ssl/megit.key.insecure to generate a CSR.
onprem/box/. Replace domain name “localhost”, “app.localhost”, “web.mirth.localhost” and “admin.mirth.localhost” with the actual domain namesopenssl req -new -key ssl/megit.key.insecure -out megit.csr \
-subj "/C=IE/ST=Co. Dublin/L=Dublin/O=MEG/OU=QMS/CN=localhost" \
-addext "subjectAltName=DNS:localhost,DNS:app.localhost,DNS:web.mirth.localhost,DNS:admin.mirth.localhost"
Send the generated megit.csr to CA for signing. Once you have the signed certificate,
you can follow these steps to add it to the web server.
You can use openssl to verify the received certificate. Replace-inform derwith “pem”, or remove it altogether if certificate is not in “der” format.openssl x509 -text -inform der < ssl/megit.crt
A valid certificate will contain extensions listing all required subdomain names:
X509v3 extensions:
        X509v3 Subject Key Identifier:
            35:A1:7D:6B:77:BA:17:29:43:18:11:FA:B3:89:EA:2F:10:74:56:7D
        X509v3 Authority Key Identifier:
            35:A1:7D:6B:77:BA:17:29:43:18:11:FA:B3:89:EA:2F:10:74:56:7D
        X509v3 Basic Constraints: critical
            CA:TRUE
        X509v3 Subject Alternative Name:
            DNS:localhost, DNS:app.localhost, DNS:web.mirth.localhost, DNS:admin.mirth.localhost
Troubleshooting
Self-check
The self-check command checks various components of the project to see if they are running and available.
It is implemented in self-check.sh script.
vagrant ssh -c self-check
Note
the self-check may return false negatives, for example report directory as non-writeable while it is writeable. Verify any reported issues manually
For example, create a file using touch media/test.txt to verify that media folder can be written to.
HTTPS
When testing HTTPS connections, self-check uses localhost as the hostname. If certificate is bound to a different domain name,
the check will fail. Use curl to verify the problem.
export CURL_CA_BUNDLE=/etc/ssl/certs/megit.crt
curl --head https://localhost/
curl --head https://app.localhost/
curl --head https://web.mirth.localhost/
curl --head https://admin.mirth.localhost/
The output will tell you whether the issue is with untrusted (self-signed) certificate, which indicates that certificate
served by nginx is different than CURL_CA_BUNDLE, or the hostname does not match.
Commands
When working with the Vagrant box, the following commands are essential:
# Start Vagrant box
vagrant up
# Reboot running vagrant VM
vagrant reload
# Connect to the running vagrant VM
vagrant ssh
# Provision VM again (install/upgrade all software, including MEG and the client app)
vagrant up --provision
vagrant provision
# Delete the VM to start from scratch
vagrant destroy

# Reload nginx configuration
sudo nginx -s reload
# Run the project
docker-compose up -d
The box also contains utility packages:
- net-tools
Network utilities for diagnosing connectivity and issues such as ifconfig and netstat.
- postgres-client
Command-line PostgreSQL client utility; can be used to test database connectivity and access. Use psql to connect the database and issue commands. For example:
psql -h $POSTGRES_HOST -U megforms megforms
Logs
- nginx logs
The log files for nginx are located in
/var/log/nginx.- application logs
MEG logs are stored in
/home/vagrant/logsdirectory. It should be mounted onto host machine. To follow docker logs, run docker-compose logs -f inside Vagrant VM.See also
Migrations
Migrations should run automatically when VM starts up. They are necessary for the site to function correctly. They are only necessary when upgrading the project.
To view applied migrations:
vagrant ssh -c "docker-compose run cms ./manage.py showmigrations"
To manually trigger migration service:
vagrant ssh -c "docker-compose up database-migrate"
To view last migration logs:
vagrant ssh -c "docker-compose logs -f database-migrate"
Common Errors
- VM isn’t running
Sometimes the VM will be running in virtualbox, but vagrant think’s the VM is down:
$ vagrant ssh
VM must be running to open SSH connection. Run `vagrant up`
to start the virtual machine.
To fix this, open virtualbox and stop the VM. You should then be able to start the VM using vagrant.
- Virtualbox conflict
Sometimes when starting the VM via vagrant there will be a conflict with virtualbox:
$ vagrant up
A VirtualBox machine with the name 'megit-base' already exists.
Please use another name or delete the machine with the existing
name, and try again.
To fix this, open virtualbox and remove the VM with that name, deleting all files. Then rebuild the VM using vagrant.
Deployment
These files are deployed directly to client and can be modified to customized individual deployment.
Important
Deployment files are located in /onprem/deployment. All vagrant commands in this section need to be ran
in the same folder as the deployment Vagrantfile.
VagrantfileA Vagrant file based off the box and configures the specific VM instance such as memory and CPU allowance, directory paths etc.
envEnvironment variables for MEG. To be copied during initial deployment and updated as-needed. Changes made to this file require vagrant reload.
New Deployment
Note
When setting up a new server, document any relevant usernames, passwords, and paths.
Important
These steps assume that you have already built and packaged the vagrant box
Ensure VT-x is enabled in BIOS for optimal performance
Install and configure software
Install VirtualBox.
Requires VC++ 2019 Redistributable
Install PostgreSQL
Add
C:\Program Files\PostgreSQL\12\bintoPATHin environment variables.Modify
C:\Program Files\PostgreSQL\12\data\postgresql.confto accept connections from inside VM:listen_addresses = '*'
Modify
C:\Program Files\PostgreSQL\12\data\pg_hba.conf. Add the following line at the end of the file:host all all 0.0.0.0/0 md5
Restart postgresql service
ensure that postgresql is allowed connections from Public networks in Windows Firewall
Create database and user account for QMS:
psql -U postgres -c "CREATE USER megforms WITH PASSWORD 'password'; ALTER USER megforms CREATEDB;"
createdb -U postgres -O "megforms" --encoding=UTF8 "megforms"
Create database and user account for mirth connect:
psql -U postgres -c "CREATE USER mirth WITH PASSWORD 'password'; ALTER USER mirth CREATEDB;"
createdb -U postgres -O "mirth" --encoding=UTF8 "mirth"
Important
Replace
'password'with a secure passwordInstall Vagrant
Deploy the Vagrant Box onto Windows Server.
Make the necessary changes to the config files
Update
POSTGRES_HOSTandPOSTGRES_PASSWORDinenvaccording to host’s address and password set in the previous stepSet adequate CPU and memory settings in
Vagrantfile(e.g.vm.cpusset to maximum available cores,vm.memoryset to half available memory)Update folder mappings in
Vagrantfile
Run the vagrant box
Add base box and start the VM.{version}represents the version number of MEG back-end being deployed.vagrant box add meg-qms-{version}.box --name meg-qms-{version} vagrant up
Important
After box is added, ensure that
config.vm.boxinVagrantfilematches the newly added box name (meg-qms-{version})Note
Append version number to
vm.nameinVagrantfile- this is necessary to make the vm name unique in the future when new update is deployed. It can be changed at any time the VM is deployed by restarting the VM using vagrant reload.Ensure that migrations have ran to completion
Run this command to watch database migration progressvagrant ssh -c "docker-compose logs -f database-migrate"
Create superuser account
this command can be invoked directly from Windows to create the initial superuser account that can be used to access django admin.vagrant ssh -c "docker-compose run cms python manage.py createsuperuser"
Set-up VM to start automatically when system boots up
Open Task Scheduler in Windows
Select “Create Basic Task”
Enter the following details:
- Name
“megit”
- When do you wan the task to start?
“When the computer starts”
- Action
“Start a program”
- Program
“vagrant”
- Arguments
“up”
- Start in:
Paste the path to the folder where
Vagrantfileis located
Edit the schedule and update it with the following
- General tab
Select “Run whether user is logged on or not”
When running the task, use the following user account: select the same user account as used to run the VM manually
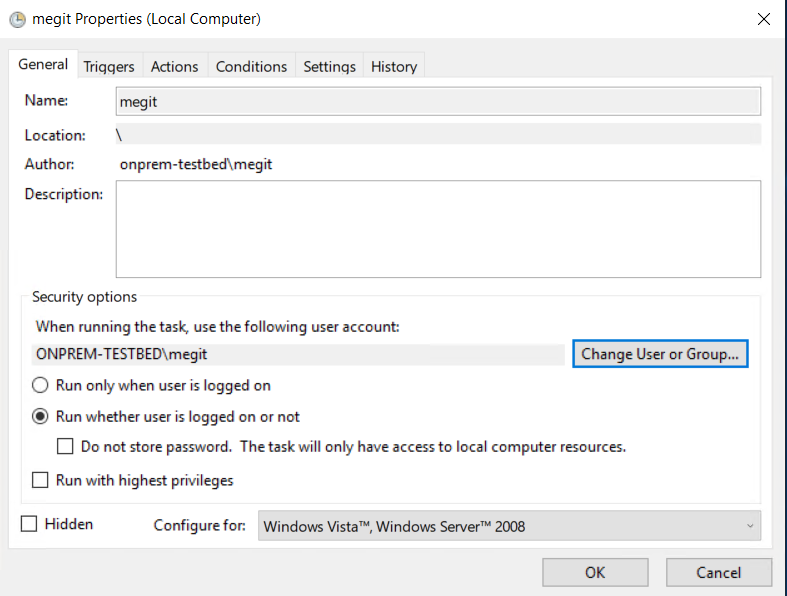
Example schedule configuration dialog showing correct configuration for General tab
- Settings
Tick “If the task fails, restart every 1 minute”
See also
Supporting article: https://superuser.com/questions/1027410/how-do-you-configure-virtualbox-vm-to-autostart-after-windows-10-reboot
Replace SSL certificate with a signed one
Add or un-comment the following line in the deploymentVagrantfileto add the certificate to VM.config.vm.provision "file", source: "megit.crt", destination: "/home/vagrant/ssl/megit.crt", run: "always" # You will also need to reload nginx configuration to use the new cert config.vm.provision "shell", run: "always", inline: <<-SHELL nginx -s reload SHELL
Important
This is assuming you have used the key provided in
onprem/box/ssl/. If for some reason you used a different key, you need to add that key to the VM as wellconfig.vm.provision "file", source: "megit.key", destination: "/home/vagrant/ssl/megit.key", run: "always"
If nginx refuses to use the key due to file permissions, add chmod and chown commands to set owner and permissions as a part of provisioning step in
Vagrantfile.See also
Follow steps in Generate a signed SSL certificate CSR and get a signed certificate
Log in to django admin and update the Site object with correct domain name.
Updating on-prem installation
Deploy new update
Important
Before update, take note of any relevant release notes and apply the necessary steps before/after update.
Transfer the box built in Build and package the Box to the server
Use vagrant box add to add the box on the server (Replace
{version}with the actual version number being imported):import box into vagrant. Give the new box a unique name so it does not override previous version.vagrant box add meg-qms-{version}.box --name meg-qms-{version}
Take backup of the data using backup-db and backup-media commands inside the VM
Use vagrant ssh to run commands inside the VMvagrant ssh -c "backup-db" vagrant ssh -c "backup-media"
Important
Verify that backup was created and accessible on host machine. The new backup file size should be similar to other backups.
Update
Vagrantfile: changeconfig.vm.box(line 4) to the newly imported box name (e.g.meg-qms-1.0)Locations inVagrantfileto be updated1VAGRANTFILE_API_VERSION = "2" 2 3Vagrant.configure(VAGRANTFILE_API_VERSION) do |config| 4 config.vm.box = "meg-qms-1.0" 5 6 config.vm.provider "virtualbox" do |vm| 7 vm.name = "megit-qms" 8 # ... 9 end 10 11 # ... 12end
Remove the current version of MEG QMS
vagrant destroyStart up the VM
vagrant up
Note
The console output should tell you that the new box is being imported:
==> default: Importing base box 'meg-qms-v1.0'...
Verify that site is working correctly
site is available at http://localhost/ and correct version is displayed in the footer
migrations have ran successfully. Use the following command to view migration logs:
vagrant ssh -c "docker-compose logs -f database-migrate"
The log should not contain errors.
Alternatively, run showmigrations to view a list of migrations and ensure all boxes are ticked:
vagrant ssh -c "docker-compose run cms ./manage.py showmigrations"
client app is available and version number is correct
Use Self-check utility to quickly scan the VM
Refer to Troubleshooting section if anything is not working
After successful upgrade, old boxes can be removed.
Note
This is an optional step and its only purpose is to conserve disk space.
List all available boxes, and delete old versions, but keep 2 most recent versions
vagrant box list
vagrant box remove meg-qms-1.0
Copy error logs onto a portable drive to investigate any crashes later.
Rolling-back update
If updated version of box will not boot for some reason, you can revert to the previous version of the vm.
Revert box version in
Vagrantfileto the previous versionRun vagrant destroy
Run vagrant up
Restore backup using instructions from Restoring from backup
Note
This step is only necessary if the new box booted up and started migrations
Maintenance
Application logs
The application logs are stored in ~/logs. This directory should be mounted onto a drive shared with host machine.
~/logs/errors contains error logs while remaining folder contain application logs by date.
Performance Monitoring
The on-prem deployment can log performance data to an SQLite database. When enabled, it will write per-process
performance insights into ~/logs/traces/ directory. To enable, set TRACE_SQLITE_EXPORTER to a truthy
value, such as True.
Note
Performance tracing itself may affect performance, so disable it when not needed, or set it to a low sampling rate when used over a long period. Use high sample rate (1.0) only when actively troubleshooting performance.
The trace files can be easily collected, sent, and opened using any SQLite utility, or PyCharm.
Recommended setup:
# Enable tracing to SQLite db file
TRACE_SQLITE_EXPORTER=True
# Trace only 1% of requests
INSIGHTS_SAMPLE_RATE=0.01
# Don't trace every single SQL query
INSIGHTS_PSQL_INTEGRATION=False
# leave blank to create a separate database for each process
TRACE_SQLITE_FILENAME=
See also
Alternatively, to view data instantly in logs, use log exporter by setting TRACE_LOGGING_EXPORTER to True.
This will print out tracing data into console in real time.
Backups & restoration
Backups are stored in /home/vagrant/backups. Nightly backups are scheduled using crontab.
The CRON file onprem/box/database-utils/cron is installed in /etc/cron.d/backup when box is built.
Important
The /home/vagrant/backups folder must be mounted on the host machine so that backups persist when VM is re-built.
Backup commands:
These commands can be ran inside the VM. Use vagrant ssh to shell into the VM.
- backup-db
Dumps postgres database contents of the database
POSTGRES_DBatPOSTGRES_HOSTinto~/backups/dbusing pg_dump. The files are dated and have the following format:meg-backup-2023-04-24_132601.dump.- backup-media
Synchronizes media files using rsync into
~/backups/media. Unlike database backups, existing files are overwritten, as django will typically create a new filename every time a new file is uploaded.- restore-db [db-name] [file-path]
Loads data from backup located in
[file-path]to a new database named[db-name].- backup-mirth
Dumps postgres database contents of the database
MIRTH_DATABASE_NAMEatPOSTGRES_HOSTinto~/backups/mirthusing pg_dump. The files are dated and have the following format:mirth-backup-2023-06-15_130813.dump.- restore-mirth [db-name] [file-path]
Loads data from backup located in
[file-path]to a new database named[db-name]. Uses mirth connect specific credentials as defined inMIRTH_DATABASE_USERNAMEandMIRTH_DATABASE_PASSWORD.
Rescheduling backups
Backups are scheduled to run at a specific time at night. To modify the schedule, you need to update the deployment Vagrantfile
to write new cron file to /etc/cron-d/backup during provisioning. The file should be owned by root and have 755 permissions.
Restoring from backup
Use restore-db and restore-mirth commands to restore the MEG and Mirth Connect databases from backup to a new database
restore-db megforms-restored backups/db/meg-backup-2023-04-24_132601.dump
restore-mirth mirth-restored /home/vagrant/backups/mirth/mirth-backup-2023-06-15_130813.dump
After the databases are restored, exit the VM, update the POSTGRES_DB and MIRTH_DATABASE_NAME variables in env, and reload the VM using vagrant reload to apply the change to the web server.
There’s no dedicated command to restore media files, but you can just use cp to restore them by copying from ~/backups/media/ back to ~/media/
cp -r backups/media/* media/
See also
Alternatively, pg_restore command can be used directly load data into existing database. This method will overwrite data in the existing database and can lead to data loss.
pg_restore --dbname $POSTGRES_DB backups/db/meg-backup-2023-04-24_132601.dump
SSL Certificate Renewal
Certificate can be re-created on-prem without updating the base vagrant box. To do this, generate a CSR, and replace the SSL certificate.
Rolling back changes
In an event of unsuccessful upgrade, it is necessary to roll back the upgrade. Rollback steps are similar to upgrade.
Warning
These steps involve restoring database from backup. This may result in loss of any data stored after the last backup.
Change
config.vm.boxat the top ofVagrantfileback to the previous version numberRebuild the VM by destroying and re-creating it
vagrant destroy
vagrant up
ssh into the VM to restore the database
This step is necessary to undo any applied migrations.
Use vagrant ssh to access the vm and run the following commands, then exit the VM. Themegforms-restoredis a name for a new database, and the file name should point at the backup created during upgrade.restore-db megforms-restored backups/db/meg-backup-2023-04-24_132601.dump cp -r backups/media/* media/
See also
Update/add
POSTGRES_DBin theenvfile with database name used in the previous stepRestart the VM to apply change using vagrant reload
Carry out the same verification steps as during Updating on-prem installation.
Mirth Connect
A mirth connect container is deployed as part of the on prem docker deployment. It’s configured to use the same postgres server as the QMS application. Two services are exposed: * admin.mirth.localhost the endpoint used to actually configure the channels * web.mirth.localhost a web viewer of the configured channels in the mirth connect database
SMS
When installing onprem the client may wish to send SMS messages, however in offline environments they can’t leverage Twilio.
In offline environments Twilio should be disabled by setting TWILIO_ENABLED to False.
In this scenario MEG QMS has the ability to store the messages to the database. They are stored in the sms_sms table.
As the client owns the database, they can implement their own application to query the database and extract messages that need to be sent.
Below are the steps required to implement this solution:
Enable storage of SMS messages in the
envby settingSTORE_SMStoTrue.Create a user in the database with access to only the SMS table.
psql -d megforms -U postgres -c "CREATE USER sms_admin WITH PASSWORD 'password' LOGIN; GRANT CONNECT ON DATABASE megforms TO sms_admin; REVOKE ALL ON SCHEMA public FROM sms_admin; GRANT USAGE ON SCHEMA public TO sms_admin; GRANT SELECT, UPDATE ON public.sms_sms TO sms_admin;"
Important
Replace
'password'with a secure password. Ensure the arg values for-dand-Uare correct for the onprem installation you’re working with.To read
pendingmessages from the SMS table, use the below querySELECT * FROM sms_sms WHERE status = 'pending';
To update the table and mark messages as sent, use the below query
UPDATE sms_sms SET status = 'sent' WHERE id in (1, 2, 3);
Important
Replace
1, 2, 3with a list of the id’s of the messages you’d like to mark assent.To update the table and mark messages as failed, use the below query
UPDATE sms_sms SET status = 'failed' WHERE id in (1, 2, 3);
Important
Replace
1, 2, 3with a list of the id’s of the messages you’d like to mark asfailed.